SuperStreet Project Solara: TRD Brakes & Powerslot Rotor
Copied from SuperStreet's website. Rather than just pasting a link, I thought it important to cut and past it in in case the links die.
*********************************************************
Toyota Solara Project, Part 3
All Four Corners on the Solara Get New Rotors from Power Slot
By Bryn MacKinnon
Photography: Bryn MacKinnon
We now rejoin our Project Solara toward the end of its time with us. Tearfully anticipating the day it leaves our care, we took the car to Performance Products in Van Nuys, California, where Orlando, the talented mechanic who helped us out with the brake rotors for our Project Mirage previously, tackled the front and rear rotor replacement on our Solara. For the actual rotors, we turned to Power Slot. The company provided us with front and rear rotors. They have loads of applications, so if you don't happen to drive a car like our Solara, give Power Slot a call, and chances are good that they'll have rotors to fit your ride. Now watch as Orlando gives the Solara a brand-new set of stoppers.

Slick as ever.

Ah, yes. The ability to stop on the proverbial dime, all ready to whoa.

Support the car on jackstands or a lift, if you happen to have one. Remove the front wheels and tires. You can remove the rear wheels and tires now if you want to, or you can wait until you’re ready to work on the rear brakes. The choice is yours. This photo is what your stock brake assembly should look like with the wheels and tires removed.

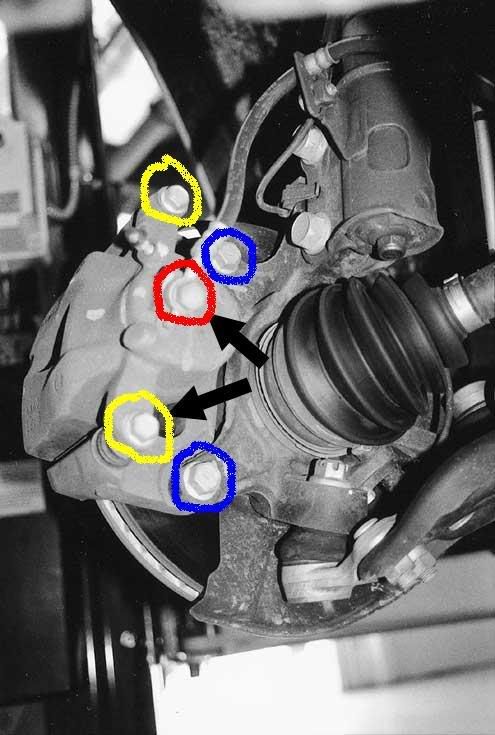
Remove the two 17mm bolts from the back of the caliper. This is a rear view of the caliper and brake hub. Those arrows are pointing to the two bolts.

Now remove the caliper from the rotor, and place it on top of the brake assembly so that you have both hands free to remove the rotor. An 8x25mm bolt should be inserted into the each of two holes on the rotor. As you screw the bolts into the rotor, the rotor will come off the hub.

Take the shiny new rotor out of the box and slide it onto the hub.

Remove the old brake pads from the caliper. Now there’s an empty space ready for you to install the new high-performance brake pads. Ours are Autospecialty Metal-Lux from Grand Auto Parts in El Segundo, California.

Depending on the brand of your new brake pads, there may or may not be anti-seize included in the box with them. If anti-seize is not included, buy some. You’ll need it to squirt and smear onto the back of all the brake pads you install today. The anti-seize should be smeared evenly all over the back of each pad. It will help prevent squealing. Slide the new brake pads into place in the caliper with the anti-seize facing away from where the rotor will hit them.

With the new brake pads securely in place, fit the caliper onto the new Power Slot rotor.

Insert those two 17mm bolts back into their places through the back of the caliper. You may have to wiggle and adjust the caliper to get the bolts to go through.

Here’s the finished product. Repeat the process for the other side so that both front rotors are properly installed. The caliper might seem loose at this point, but it will tighten up once you put the wheels back on.

If you didn’t remove the rear wheels and tires when you did the fronts, do so now. The stock rear brake assembly should look like this.

Just like with the front rotors, there are two bolts that you must remove to get the caliper off the rotor. However, unlike those on the front, these bolts are 14mm. Remove them now.

Just like with the front rotors, slide the caliper off the hub and place it on top of the brake assembly so you can remove the stock rotor.

Just like with the front rotors, grab the old stock rotor and slide it off the hub.

Here’s something different (you thought we were going to say "Just like with the front rotors," didn’t you? Tricked ya!). Push the black rubber access plug out of the hole it sits in on the stock rotor. Hold onto it. Don’t throw it away.

Push the rubber access plug into the corresponding hole on the new Power Slot rotor.

Now position the rotor on the hub bolts so that the access plug lines up with the access hole on the brake assembly when you put the rotor on.

Just like with the front rotors, put new anti-seized brake pads into position in the caliper, and then slide the caliper into place on the rotor. Insert the two 14mm bolts into the back of the caliper, wiggle, and tighten them down.

There it is, your new rear brake rotor, courtesy Power Slot. If you’ve done the installation properly, like Orlando from Performance Products did for our Project Solara, then it should look like this. Repeat the whole process for the other side, and ta-da! You’re done.
*********************************************************
Disclaimer: I take no responsibility for the above text and images. This is taken from SuperStreet.com. http://www.superstreetonline.com/howto/3324/index.html
Please check this information against professional advice and service manuals for proper safety procedures and installation instructions. This is an intermediate level installation and basic knowledge of automotive repairs should be acquired before attempting.
*********************************************************
Toyota Solara Project, Part 3
All Four Corners on the Solara Get New Rotors from Power Slot
By Bryn MacKinnon
Photography: Bryn MacKinnon
We now rejoin our Project Solara toward the end of its time with us. Tearfully anticipating the day it leaves our care, we took the car to Performance Products in Van Nuys, California, where Orlando, the talented mechanic who helped us out with the brake rotors for our Project Mirage previously, tackled the front and rear rotor replacement on our Solara. For the actual rotors, we turned to Power Slot. The company provided us with front and rear rotors. They have loads of applications, so if you don't happen to drive a car like our Solara, give Power Slot a call, and chances are good that they'll have rotors to fit your ride. Now watch as Orlando gives the Solara a brand-new set of stoppers.
Slick as ever.
Ah, yes. The ability to stop on the proverbial dime, all ready to whoa.
Support the car on jackstands or a lift, if you happen to have one. Remove the front wheels and tires. You can remove the rear wheels and tires now if you want to, or you can wait until you’re ready to work on the rear brakes. The choice is yours. This photo is what your stock brake assembly should look like with the wheels and tires removed.
Remove the two 17mm bolts from the back of the caliper. This is a rear view of the caliper and brake hub. Those arrows are pointing to the two bolts.
Now remove the caliper from the rotor, and place it on top of the brake assembly so that you have both hands free to remove the rotor. An 8x25mm bolt should be inserted into the each of two holes on the rotor. As you screw the bolts into the rotor, the rotor will come off the hub.
Take the shiny new rotor out of the box and slide it onto the hub.
Remove the old brake pads from the caliper. Now there’s an empty space ready for you to install the new high-performance brake pads. Ours are Autospecialty Metal-Lux from Grand Auto Parts in El Segundo, California.
Depending on the brand of your new brake pads, there may or may not be anti-seize included in the box with them. If anti-seize is not included, buy some. You’ll need it to squirt and smear onto the back of all the brake pads you install today. The anti-seize should be smeared evenly all over the back of each pad. It will help prevent squealing. Slide the new brake pads into place in the caliper with the anti-seize facing away from where the rotor will hit them.
With the new brake pads securely in place, fit the caliper onto the new Power Slot rotor.
Insert those two 17mm bolts back into their places through the back of the caliper. You may have to wiggle and adjust the caliper to get the bolts to go through.
Here’s the finished product. Repeat the process for the other side so that both front rotors are properly installed. The caliper might seem loose at this point, but it will tighten up once you put the wheels back on.
If you didn’t remove the rear wheels and tires when you did the fronts, do so now. The stock rear brake assembly should look like this.
Just like with the front rotors, there are two bolts that you must remove to get the caliper off the rotor. However, unlike those on the front, these bolts are 14mm. Remove them now.
Just like with the front rotors, slide the caliper off the hub and place it on top of the brake assembly so you can remove the stock rotor.
Just like with the front rotors, grab the old stock rotor and slide it off the hub.
Here’s something different (you thought we were going to say "Just like with the front rotors," didn’t you? Tricked ya!). Push the black rubber access plug out of the hole it sits in on the stock rotor. Hold onto it. Don’t throw it away.
Push the rubber access plug into the corresponding hole on the new Power Slot rotor.
Now position the rotor on the hub bolts so that the access plug lines up with the access hole on the brake assembly when you put the rotor on.
Just like with the front rotors, put new anti-seized brake pads into position in the caliper, and then slide the caliper into place on the rotor. Insert the two 14mm bolts into the back of the caliper, wiggle, and tighten them down.
There it is, your new rear brake rotor, courtesy Power Slot. If you’ve done the installation properly, like Orlando from Performance Products did for our Project Solara, then it should look like this. Repeat the whole process for the other side, and ta-da! You’re done.
*********************************************************
Disclaimer: I take no responsibility for the above text and images. This is taken from SuperStreet.com. http://www.superstreetonline.com/howto/3324/index.html
Please check this information against professional advice and service manuals for proper safety procedures and installation instructions. This is an intermediate level installation and basic knowledge of automotive repairs should be acquired before attempting.