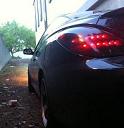
Gen2 Headlight Blackout DIY (56k beware)
![]() by GzNutz » Tue Jan 31, 2012 12:42 pm
by GzNutz » Tue Jan 31, 2012 12:42 pm
Here is a lengthy write up of how to disassemble your headlights. Do this at your own risk.
First you need to remove your headlights from your lara. Its a simple process, just remove a few bolts from the top or your bumper, a few from the bottom, and one behind the plastic guards in each wheel well. Next you need to remove the bolts holding in the headlights.
Now for the fun stuff.
Preheat oven to 350 bake. This was the lowest setting on my oven. Adjust shelve so that your light is as far from the heating element as possible if using an electric oven like mine. The first light I did I had too close to the element and warped the bottom.

While preheating prep your light by removing the 5x T15 star screws from the backside edges of the light.

Remove all three bulbs and the soft rubber surrounding the high beams and driving lights. For the high beams you need to remove the plastic piece holding in the rubber by taking out the three screws holding it in. There is a triangle on the bottom of the plastic ring which points down jic you don't notice it when removing for reassembly.


Now you're ready to bake! Set your timer for 5 minutes and throw her in. Below is the pic where the light was waaaayyy to close to the bottom heating element. I ended up moving the shelf up two notches.


Constantly check the plastic tabs on the bottom of the light for drooping. Any drooping should be a sign of the oven being too hot and the plastic is melting(not good). After 5 minutes pull the light out and start to pull the lens away from the backing. If it is tough you can put the light back in the oven for another minute or so to loosen the sealant more. Both sides will come apart relatively easy when the sealant is warm enough.

Now lay the lens on a towel on its face.

Next remove the screws along the outside of the lens which hold the chrome insert in.


Then remove the screws holding the turn signal housing in place.


Now lift out the reflector. It just lifts out by gripping the inner most portion of the lens and pulling like it was on a hinge.


The clear signal lens comes out next.

Go ahead and remove the remaining chrome from the lens.

To remove the high beam bezel, gently pry the corner tab open and lift out.


For the round driving lamp bezel you need to slide a blade screwdriver in from the back and push the interlocking tab towards the front. Don't fully pop it out and move on to the next tab. Start with the tab furthest from the non locking alignment tab and then do the next furthest. When both of these are free you can push the backside of the bezel on the opposite end from the alignment tab and it should hinge out.


For the orange corner reflector you need to take a bladed screwdriver and push in a tab from the back. You can see the two glowing orange tabs from the backside, either one should free the reflector.


That's it for the tear down.
Since you've got the light apart you might as well take care of the squirrel spotters.
Start by removing the projector lens. Three screws hold it in place. Once removed flip it on to the lens and remove the three screws on the back. Remove the lens and glass reflector from the metal cut-off plate.


Here is the metal plate removed. The tiny rectangular hole is what causes the squirrel spotting feature on our laras.

There is a metal tab that is bent at a 45 degree angle towards the reflector on the metal cut-off plate.

Bend the tab flat against the plate with your fingers and then use pliers to crimp it further closed.

Taking a note from poland's thread... seal the cracks around the folded flat metal tab with jb weld. This should eliminate any possible glare from sneaking around the metal and out the rectangular hole.


Be sure to scrape excess jb weld from across the top of the cut-off line so it stays clean.
Reassemble your lens and put back into the black moulded housing.
Back to the chrome.....
Prep the surface with whatever your paint of choice recommends. I used Krylon Fusion which only needed to be wipped down with mineral spirits. Paint, assemble in reverse of above procedures, and enjoy.
More pics to come.
First you need to remove your headlights from your lara. Its a simple process, just remove a few bolts from the top or your bumper, a few from the bottom, and one behind the plastic guards in each wheel well. Next you need to remove the bolts holding in the headlights.
Now for the fun stuff.
Preheat oven to 350 bake. This was the lowest setting on my oven. Adjust shelve so that your light is as far from the heating element as possible if using an electric oven like mine. The first light I did I had too close to the element and warped the bottom.
While preheating prep your light by removing the 5x T15 star screws from the backside edges of the light.
Remove all three bulbs and the soft rubber surrounding the high beams and driving lights. For the high beams you need to remove the plastic piece holding in the rubber by taking out the three screws holding it in. There is a triangle on the bottom of the plastic ring which points down jic you don't notice it when removing for reassembly.
Now you're ready to bake! Set your timer for 5 minutes and throw her in. Below is the pic where the light was waaaayyy to close to the bottom heating element. I ended up moving the shelf up two notches.
Constantly check the plastic tabs on the bottom of the light for drooping. Any drooping should be a sign of the oven being too hot and the plastic is melting(not good). After 5 minutes pull the light out and start to pull the lens away from the backing. If it is tough you can put the light back in the oven for another minute or so to loosen the sealant more. Both sides will come apart relatively easy when the sealant is warm enough.
Now lay the lens on a towel on its face.
Next remove the screws along the outside of the lens which hold the chrome insert in.
Then remove the screws holding the turn signal housing in place.
Now lift out the reflector. It just lifts out by gripping the inner most portion of the lens and pulling like it was on a hinge.
The clear signal lens comes out next.
Go ahead and remove the remaining chrome from the lens.
To remove the high beam bezel, gently pry the corner tab open and lift out.
For the round driving lamp bezel you need to slide a blade screwdriver in from the back and push the interlocking tab towards the front. Don't fully pop it out and move on to the next tab. Start with the tab furthest from the non locking alignment tab and then do the next furthest. When both of these are free you can push the backside of the bezel on the opposite end from the alignment tab and it should hinge out.
For the orange corner reflector you need to take a bladed screwdriver and push in a tab from the back. You can see the two glowing orange tabs from the backside, either one should free the reflector.
That's it for the tear down.
Since you've got the light apart you might as well take care of the squirrel spotters.
Start by removing the projector lens. Three screws hold it in place. Once removed flip it on to the lens and remove the three screws on the back. Remove the lens and glass reflector from the metal cut-off plate.
Here is the metal plate removed. The tiny rectangular hole is what causes the squirrel spotting feature on our laras.
There is a metal tab that is bent at a 45 degree angle towards the reflector on the metal cut-off plate.
Bend the tab flat against the plate with your fingers and then use pliers to crimp it further closed.
Taking a note from poland's thread... seal the cracks around the folded flat metal tab with jb weld. This should eliminate any possible glare from sneaking around the metal and out the rectangular hole.
Be sure to scrape excess jb weld from across the top of the cut-off line so it stays clean.
Reassemble your lens and put back into the black moulded housing.
Back to the chrome.....
Prep the surface with whatever your paint of choice recommends. I used Krylon Fusion which only needed to be wipped down with mineral spirits. Paint, assemble in reverse of above procedures, and enjoy.
More pics to come.
Last edited by GzNutz on Tue Jan 31, 2012 3:50 pm, edited 1 time in total.
-
GzNutz - SolaraGuy Semi-Pro Racer

- Posts: 2354
- Joined: Mon Oct 22, 2007 7:36 pm
- Location: Land of Beer